Pages

Showing posts with label author: Gemma. Show all posts

Friday, April 24, 2015

spring favourites


First of all, spring is my favourite thing ever so the rest doesn't really count ;) But here are some things that are making me happy these day's:

- Erlend Øye - La Prima Estate
this song, and also its video, It's so happy, and come on look at the guy. (the rest of his music is kind of cool too). It's my favourite song this month
- spinvis
I am really diging the music of this artist, his lyrics are so weird but in a good way. He sings in Dutch though. But I'll translate one of my faforite quotes: 'sometimes when you are not looking the clock goes backward' The storys he tells are like surrealistic, which is my favourite art movement. Any way he is great.
- flowers and leaves
I tend to get insanely happy when the trees grow leaves again, every day when I ride on my bike to the campus I have a super wide grin on my face caused by all the pretty tree's and flowers I see on my way. Also blossom is about the most beautiful thing ever. Though the flowers in the picture are fake they have a similar effect on me so I keep them at my desk to cheer me up when I am frustrated with my math homework.
-Getting sunburns
eh, yeah though sunburns aren't really comfortable, I was more then ok with being able to get them. Last week me and Tim went for a hike and it was warm enough to wear just a dress, no tights no sweater just a dress, I wasn't wearing sunscreen so my shoulders were red at the end of the day. But I didn't mind, it was like a proof that summer is coming.
-There is a cat
that sometimes walks around our house and it's such a sweetie I really like petting it. When I was still living with my parent's we had a cat, and now I don't. So I am happy to have this one to cuddle with.

-Sewing
I had a 3 hour gap between lectures so I decided to make a pompom trim skirt. I really like making stuff, though sewing machines tend to make me go mad, somehow they're constantly having troubles with the thread getting knotted and stuff. I really like the skirt it's so happy. If you'd be interested I could do a tutorial, it doesn't require much more skill than knowing how to sew a straight line. Also I really like this book Surrur that Emma gave me, it's full of fun sewing projects using marimekko's bold fabrics. In the pic below you see a page of the book that inspired me to do a skirt (my original plan was pompom shorts).
-Our pretty little house
Being surrounded by pretty things makes me smile, and I love our house so much. I'd do a home tour if it wouldn't mean I had to clean every thing up :P. Me and my love are living there for 4 months now and everything is going great. I am so happy with him :)


What are your favourite things these days?
-Gemma

Thursday, March 26, 2015

DIY electric tape wall art


When I saw this image I was sold, I had to have a 3d cube wall art thing. So I made one, this is one of the things I love about having my own home, I can decorate everything the way I like it :). Please excuse the mess, I am trying to keep it real here (or I'm just lazy... hehe). Now lets have a look at how to do it:
1. you'll need a design you like and some electric tape.
2. you can draw your design on the wall or project it or just imagine it.
3. take your tape and put it on.
If I'd do this again I would pay attention to the placing, mine is not centred which bothers me a lot. The tape is available in any color, but I liked black. I think you can do this with any type of tape, though I didn't try it. This is really simple, but has a great effect. I love how you can see the cube in two ways, try to look at the two squares in the left bottom corner and the right upper corner and try to see them as the front plane of the cube. Isn't that cool. It holds up pretty great and it's totally removable. I think it's great and I hope you do to!
-Gemma

Tuesday, March 17, 2015

my painting a day project

Some time ago I finished this sketchbook. To be very honest with you, this was the first time in my life I filled an entire book, I tend to stop and start over again all the time somehow. I painted a little thing each evening just before going to bed for a little over 2 months (maybe not every single night hehe) If you follow me on instagram you  have probably already seen some of these. I also wrote a post with tips on art journaling that featured some of my drawings from this book. I hope you'll have a look and please tell me if you like them, and which one is your favorite! Mine is the left one at 0:40 or maybe the more abstract one at 1:22...

ps. does anyone have a good suggestion for free video editing software for windows 8? I wanted to add some music but it didn't work out so well...
-Gemma

Monday, March 2, 2015

DIY- foldable drying rack

 We live in a small house, which is great because it means we have to clean less and we don't have to walk a lot of stairs all the time. But it also means we don't have that much space for everything. So sometimes you have to be creative with were to put things like whet clothes. We don't really have space for a tumble dryer so we have to use clothes lines. The former owners of the house had a similar drying rack. And I liked the idea a lot, it is really space saving. After having a really crappy drying rack, destroying it, and trying things with clotheslines through the entire house, my mom helped us out and made this beautiful rack. It is located over the stairs but you can have one anywhere. Yeah you heard that you can have one too! You only need some wood, rope, screws and two hinges.


Here is how to:
1. saw slats in the proper length to mach your wanted dimentions. (ours has 2 times 110 cm and 2 times 85 cm).
2. Mark the places where you want the holes for the clothesline, ours are 7 cm apart. Use a drill to make the holes.
3. Use wood glue to assamble the frame.
4. reinforce it with pieces of wood in the corners (I don't know what these are called). To make them simply take a piece of wood and cut it of on a 45 degree angle at both sides. Use nails and woodglue to attach it.
5. Make a knot on one side of the line and take the line through the holes. Make sure there is some tension on it.
6. At the end you can make a knot or something, we used a wire connector instead of a knot (photo below). That was because it would lose tension if we tried to knot it. If anyone has a better solution for this it would be great to hear. But what we used works, it's just not pretty.

7. attach the hinges to the rack with some screws. Do the same for the wall and you're done! I'm not sure how much time it takes exactly to build it but it is totally doable in a single day even without power tools. Since it is not that complicated I think it is a great project for beginners in woodworking.
We have been using it for over a month and it is still in perfect shape.
I hope you like it. If you have any suggestions or thoughts about it please let me know in the comments :)
-Gemma


Friday, February 6, 2015

why I think shooting manual is overrated

Just to be clear, I don't say it is overrated to learn about your camera settings. I am just saying that manual mode makes things harder than they should be. When I am on pinterest I often see articles that tell you that you have to learn manual mode because it's super important and you will never take a pretty picture if you don't (I'm exaggerating a bit). I also see a lot of cheat sheets that are supposed to help you with this super hard mode, some of them are only confusing to me. Anyway I know that shooting manual is a big deal to many people. But I don't think it is necessary to do all that. You can achieve just as pretty photos on a easier way.

What is manual mode exactly? It is a setting on the more advanced camera's that allows you to set every thing exactly how you want it. Though that seems great, it has it's cons. You have freedom, but you also have to set every thing manually, and constantly adjust your settings when the light changes. If you don't your photos will be either over or under exposed. It is quite hard to master, it takes practice to get your exposure right without it taking to much time.
The alternative. Most of the time I use my camera on aperture priority mode (A or Av depending on the brand you use). You can pick a aperture, and with that control the depth of field. Also you can chose an ISO number, so you make sure that there is no more noise that necessary. And the camera picks the shutter speed for you. So when you move into the shade a bit you don't have to adjust the settings. The same goes for the shutter speed priority mode (s or tv), but there the camera picks the aperture.
So what if you think that your photos should look brighter or a bit darker? In manual mode you take your shutter speed/aperture/iso down a step. That doesn't work in A, the camera will compensate with a longer exposure time. You can use exposure compensation for that. It works like this, while pressing the button with the +/- sign you scroll with the scrolling wheel. (located near the shutter or on the back). the + side makes the photo lighter and the - darker.

well is it completely useless then? I don't think that camera's would be better off without manual mode. I just don't think it's ideal for when you are taking regular photo's. It is useful when you are in a very dark situation, and your light meter isn't getting the exposure right. It is also fine when you are shooting in a studio where the light intensity (amount of light) is not changing.

the difference
when you have mastered manual mode, it is about as quick as a half automatic mode. You only are scrolling a bit more. So if you are already used to it it is not necessary to switch. But when you are learning photography I think it's a better idea to go with this method. It is easier to learn and you can achieve the same results. But it is still important that you understand what ISO, aperture and shutter speed do for your photo's.

If you don't agree with me I would like to hear why!
-Gemma

Monday, December 22, 2014

Tips on art journaling


I really like keeping art journals. But I'm not always so successful at finishing them. Over the years I have done quite a few of them, and recently I started to do a painting a day project. During the process I learned a few things, and today I'll be sharing them with you guys. Here we go:

when to check the internet for inspiration
The internet is a great inspiration, but it doesn't always help. The painting above is made after a photo I saw on pinterest. The internet can be a great help, but don't let it stand in your way. When you are looking at your empty page and don't know what to do don't start browsing images, you have to draw not scroll. Do use the internet for inspiration but not just before you start painting. It is harder to be truly creative when you are looking at other peoples ideas.


starting a journal
We have all seen those cute drawing/photography/painting challenges on pintrest, with names like draw every day of December. Well for me this doesn't really work, I really like them. But you have to start at the moment you feel inspired and not at the first day of the new year or of the month. In Dutch we have a saying that says that procrastination leads to cancelling the project. But it doesn't rhyme in English... anyway, If you want to start a art journal, or any project in general start now.


how to keep it up
The key is to make it a habit. Make it part of your ritual. I make a quick sketch every day just before I go to sleep. Some days I am tired and I don't take that much time. And other days I put a lot of effort in it. When you don't want to work on it every day, make sure that you think of your project when you have time. You could make it laying around on your desk so you can see it. Or you could put a note on your remote control/laptop/phone that says "you could also work on your journal instead of watching tv/9gag". I never tried that last one though...


 the white page syndrome
So you are finally there, you started a journal, filled a couple of pages, and you want to continue. But something is holding you down. It's the white page in front of you. You are afraid that when you create something on it it won't fulfil your expectations or it will be less pretty than the rest. Or maybe you just don't know where to start. Does this sound familiar to you? than you might suffer from the white page syndrome.... There is only one thing you can do to over come it, just get started. Do not look on your phone for inspiration, and do not doubt about what to do, just get started! And remember, some not so pretty pages in your journal is always better than only empty ones. Don't put pressure on yourself to create something perfect, that will just kill your creativity. This is why I don't like to work in expensive booklets, then it would be a waste if my drawing doesn't come out pretty. You can also work on sheets of paper, and collect the ones you like most in a little album.


Remember that it doesn't always have to be perfect
This is a picture of my favourite sketch book. Its called BLA and contains little drawings and captions of the small things in life that make me happy. It isn't that pretty at all but I love it so much. Even if your drawing skills aren't amazing you can still make something you love. The beauty of a journal is in it's meaning to you, and don't care to much about how others will like it. You should make it for yourself and not for someone else (like your instagram followers) or else it just won't be fun anymore after some time.


what to fill your album with
Maybe you are not so exited about painting, but don't worry there are much more fun options. One of them is making collages. Get yourself some scissors, glue and a pile of old magazines and get started. You can also use your own photos. If you like that idea, maybe scrapbooking is also something for you. An other option is text, a you can do an old school diary, write poems or make a book of quotes from your friends. Or you could combine all of these options (that would be rad).


DON'T COMPARE YOUR STUFF TO THAT OF OTHERS
If there is anything bad for your creativity is it low self-esteem. Don't think like 'I could never get as good as them'. They have probably been working on their skill for a long time, besides you are only seeing one image, probably one of the best. People don't share the stuff they are not proud of. You only see their 'stage' and not what is behind the scenes. If you really want to compare do it fair, only compare with people with the same amount of experience and with the same kind of work, don't compare a quick sketch to a masterpiece. But even then comparing is still a bad thing to do.

I hope this post inspires some of you to get creative. Thanks for reading, if you liked this post please let me know by commenting :)

Ps. I made two tutorials on making booklets, one of a vinyl record and one of it's sleeve. you could use them to start an art journals in :)
Pps. If you'd like to see more of my drawings you should take a look at my finished painting a day project. 

-Gemma

Friday, October 31, 2014

I'm moving

Look at this, Isn't it the cutest street ever? It is a full of beautiful trees and plants, and the houses are adorable. And the best part, I am going to live there! This December me and Tim are going to move in together. It's early we know, I mean we are only 18 and 19 but it will be so much fun! And it's really nice that I wont have to travel an hour to my study every day. I will be only a 10 minute bike ride away from the campus.
Now more about the house. It is pretty much like I imagined my dream house, blue window frames, wooden floors, lots of white. It even has a little garden, with a fig tree and a little shed. It's not that big but big enough for us. There are two rooms, a living and a bedroom. But it's so pretty! I'm a little obsessed. The furniture isn't going to stay but I think we will do similar things. I'm so exited!

These photos are by the company that sold the house, so I don't own them


This is really a dream come true. Delft is such a beautiful city and this house is beyond perfect. I am counting the days... 
here is a little photo of the happy couple that is going to live there. (cant wait!)
-Gemma

Wednesday, October 8, 2014

DIY vinyl record notebook

I love vinyl records as material, I already have made a bag and a book cover with it and now a notebook! So if you have some old vinyl records laying around, or find some at a flea market, this is a fun project to do. I really like listening to these old beauties but I also like crafting with those that have less pretty notes on them :D. 

  1. We start with cutting the record through the middle. You can do this by cutting a line with a craft knife. Use a ruler to make sure the line is straight. You don't have to cut all the way trough, but make sure that the paper of the label is cut trough on both sides.

2. Now break the vinyl record on the line you have drawn with your knife. Do this by laying the line on the edge of a table. Put a book on one side to spread the pressure of your hand that is keeping the record in place. With your other hand push the record down, it takes some force. And you might think It is not going well, but just push harder and it will break.


3. Now we are going to make some pages cut circular pieces of paper at the same size of your record. And then fold them in the middle.


3. Take one of your pages and glue it to your vinyl. Now you have a little booklet without pages. Isn't that a little sad, lets add some pages!


4. Use needle and tread to sew your pages in your notebook.  Go trough all your pages and also trough the back of the booklet, trough the page glued to the record. Make a few stitches and then make a little knot. And you're done!


Now you can fill your little book. Since the pages are round I am thinking to fill my pages with drawings of round things. But it's also great for poems, notes, photo's and whatever you like fill your notebooks with. I used a single (small record) but you can also use a full album (large record) if you want a little bigger pages.
Happy crafting!
-Gemma

Sunday, September 28, 2014

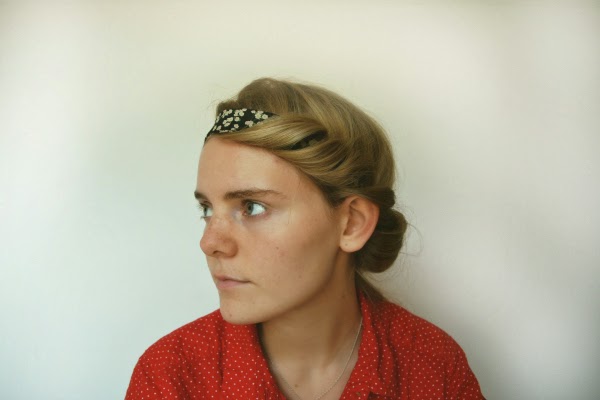
DIY twisted bandana hair updo


If you know me a little longer you will notice I love to wear headbands and bandanas. And this is one of my favourite ways to style them. When I wear this people always ask how I did it and they expect it to be a lot of work somehow, but it is actually very easy! I'm going to show you how to do this!


1.Start with making a simple parting in the middle of your hair
2.Then, take the front locks of your hair and put them to one side
3.Put on a headband / bandana / head scarf
4.Take a lock of hair and tuck it in the headband
5. go around your head like this
It looks great when it has become a little more messy over the day.


-Gemma